Introducing Yamvil: MVI Infrastructure for Android and Compose Multiplatform

I’m very excited to introduce Yamvil, a new Library and Compiler Plugin for Android and Compose Multiplatform! 🚀
MVI Architecture
MVI stands for Model-View-Intent, and it’s a pattern that helps us build apps in a more predictable and testable way.
Yamvil helps to implement MVI with the following logic:
- a
Fragment/Screenobserves anUiState(Single Source of Truth) - a
Fragment/Screensends events to a ViewModel via anUiEventtype - a
ViewModelupdates theUiStatewhen the UI needs to change, or triggers one-time actions viaUiAction
graph LR
    subgraph UiState
        E[UiAction]
    end
    A[MVIFragment] -->|Observes| UiState
    D[MVIViewModel] -->|Updates| UiState
    D[MVIViewModel] -->|Triggers| E
    A -->|Sends| C[UiEvent]
    C -->|Handled by| D
What is Yamvil?
Yamvil is a library and compiler plugin that helps us build Android and Compose Multiplatform apps using the MVI Architecture.
The Runtime Library
The library itself brings two main components:
- MVIViewModel: A ViewModel that helps us manage the state of our app using the MVI pattern
- MVIFragment: A Fragment that helps us connect our ViewModel to our UI
Implementing MVIViewModel
Imagining a simple MVIViewModel for a Dashboard screen, it would look like this:
1
2
3
4
5
6
7
8
9
10
11
12
13
14
15
16
class DashboardViewModel: MVIViewModel<DashboardUiState, DashboardUiEvent>() {

    override fun initializeUiState(): DashboardUiState {
        return DashboardUiState(state = DashboardUiState.ContentState.Loading)
    }

    override fun handleEvent(event: DashboardUiEvent) {
        when (event) {
            is DashboardUiEvent.ClickOnNext -> onClickOnNext()
        }
    }

    private fun onClickOnNext() {
        update { copy(action = Consumable(DashboardUiAction.NavigateToNext)) }
    }
}
Implementing MVIFragment
For Fragments, we can use the MVIFragment to connect our ViewModel to our UI:
1
2
3
4
5
6
7
8
9
10
11
12
13
14
15
16
17
18
19
class DashboardFragment: MVIFragment<DashboardUiState, DashboardUiEvent>() {

    override val viewModel: DashboardViewModel by viewModels()

    override fun observeUiState(uiState: DashboardUiState) {
        when (uiState.state) {
            DashboardUiState.ContentState.Loading -> onLoading()
            is DashboardUiState.ContentState.Content -> onContent(uiState.state)
            DashboardUiState.ContentState.Error -> onError()
        }

        uiState.onAction { action ->
            when (action) {
                DashboardUiAction.NavigateToNext -> navigateToNext()
            }
        }
    }
    // (...)
}
The Compiler Plugin
Composable Screens
Using Jetpack Compose, we can’t use inheritance to ensure the proper implementation for our MVI components, so that’s the job of the Yamvil Compiler Plugin!
A simple example of a Dashboard screen using the Yamvil Compiler Plugin would look like this:
1
2
3
4
5
6
7
8
9
10
11
12
13
14
15
16
17
18
19
@Composable
fun DashboardScreen(
    uiState: DashboardUiState,
    handleEvent: (DashboardUiEvent) -> Unit,
    modifier: Modifier = Modifier
) {
    when (uiState.state) {
        is DashboardUiState.ContentState.Loading -> DashboardLoadingContent()
        is DashboardUiState.ContentState.Error -> DashboardErrorContent()
        is DashboardUiState.ContentState.Content -> DashboardContent(uiState.state)
    }

    LaunchedActionEffect(uiState) { action: DashboardUiAction ->
        when (action) {
            DashboardUiAction.NavigateToNext -> {}
        }
    }
}
// (...)
How does it work?
Logic
The Compiler Plugin looks for any @Composable function with the suffix Screen and from there, checks that:
- An
MVIViewModelimplementation of the same name should exist right besides the Kotlin file that contains our@ComposableScreen - An
uiStateparameter of the same name exists and is of the relevantUiStatetype - An
handleEventlambda parameter of the same name exists, which receives the relevantUiActiontype
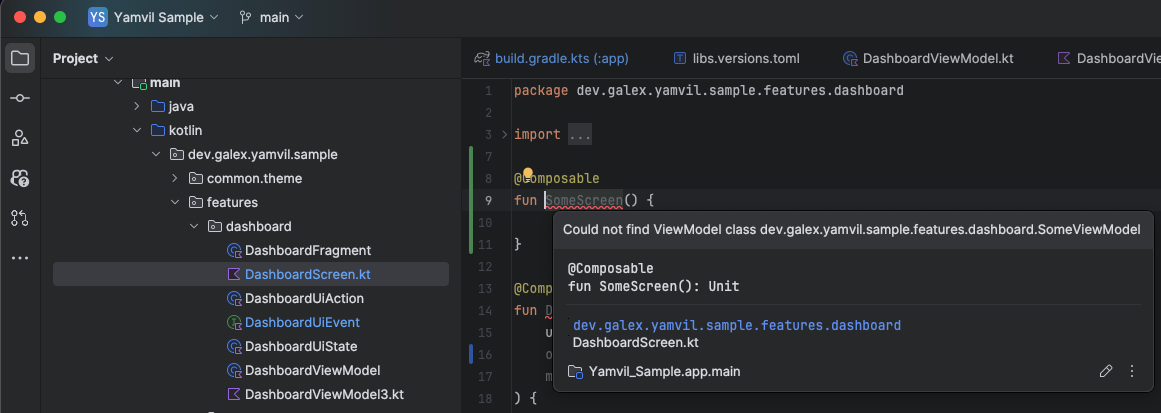
IDE Errors and Warnings
If any of those checks fail, the compiler will throw an error, and we will be able to see it in Android Studio!
How to use Yamvil?
Installation
In your libs.version.toml, add the following:
1
2
3
4
5
6
7
8
[versions]
yamvil = "0.0.2"

[libraries]
yamvil = { group = "dev.galex.yamvil", name = "runtime", version.ref = "yamvil" }

[plugins]
yamvil = { id = "dev.galex.yamvil", version.ref = "yamvil" }
Then add those to your project:
1
2
3
4
5
6
7
8
9
10
11
12
// Root build.gradle.kts
plugins {
    alias(libs.plugins.yamvil) apply false
}
// In your app/build.gradle.kts
plugins {
    alias(libs.plugins.yamvil)
}

dependencies {
    implementation(libs.yamvil)
}
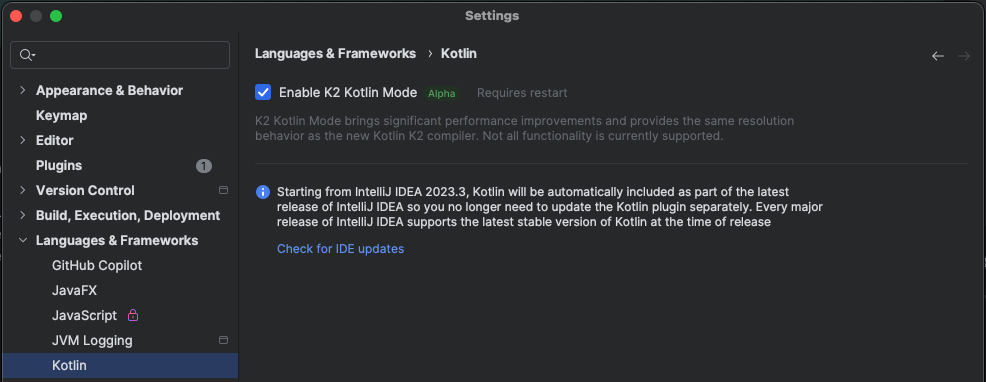
Enable the K2 IDE Plugin (Alpha)
You will need an Android Studio Koala Nightly build to be able to see K2 Compiler errors in the IDE.
Once installed, go to Settings > Languages & Frameworks > Kotlin > Compiler and enable the K2 IDE Plugin.
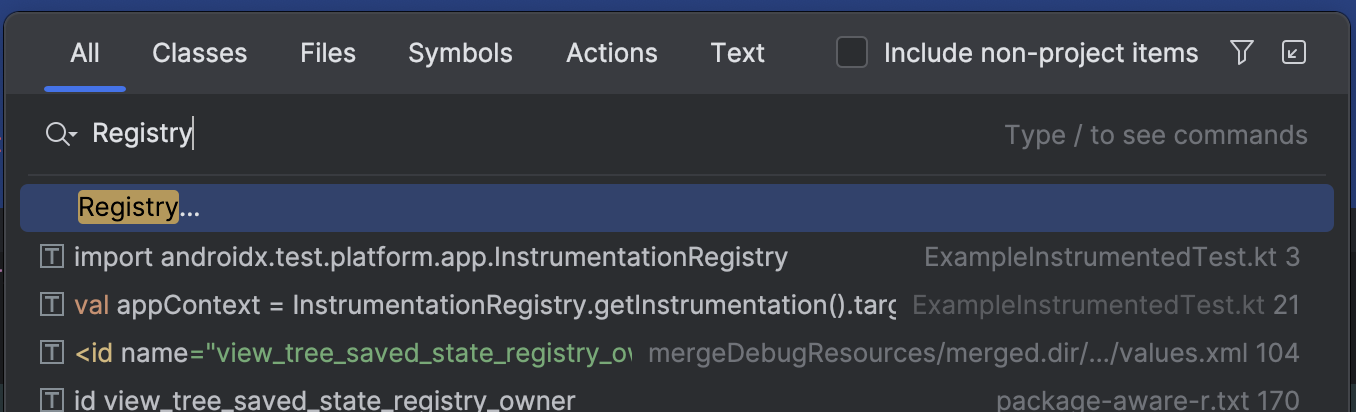
Allow 3rd party Compiler Plugins
Currently, the K2 IDE Plugin is set to enable only bundled Compiler Plugins by default, but we can fix this!
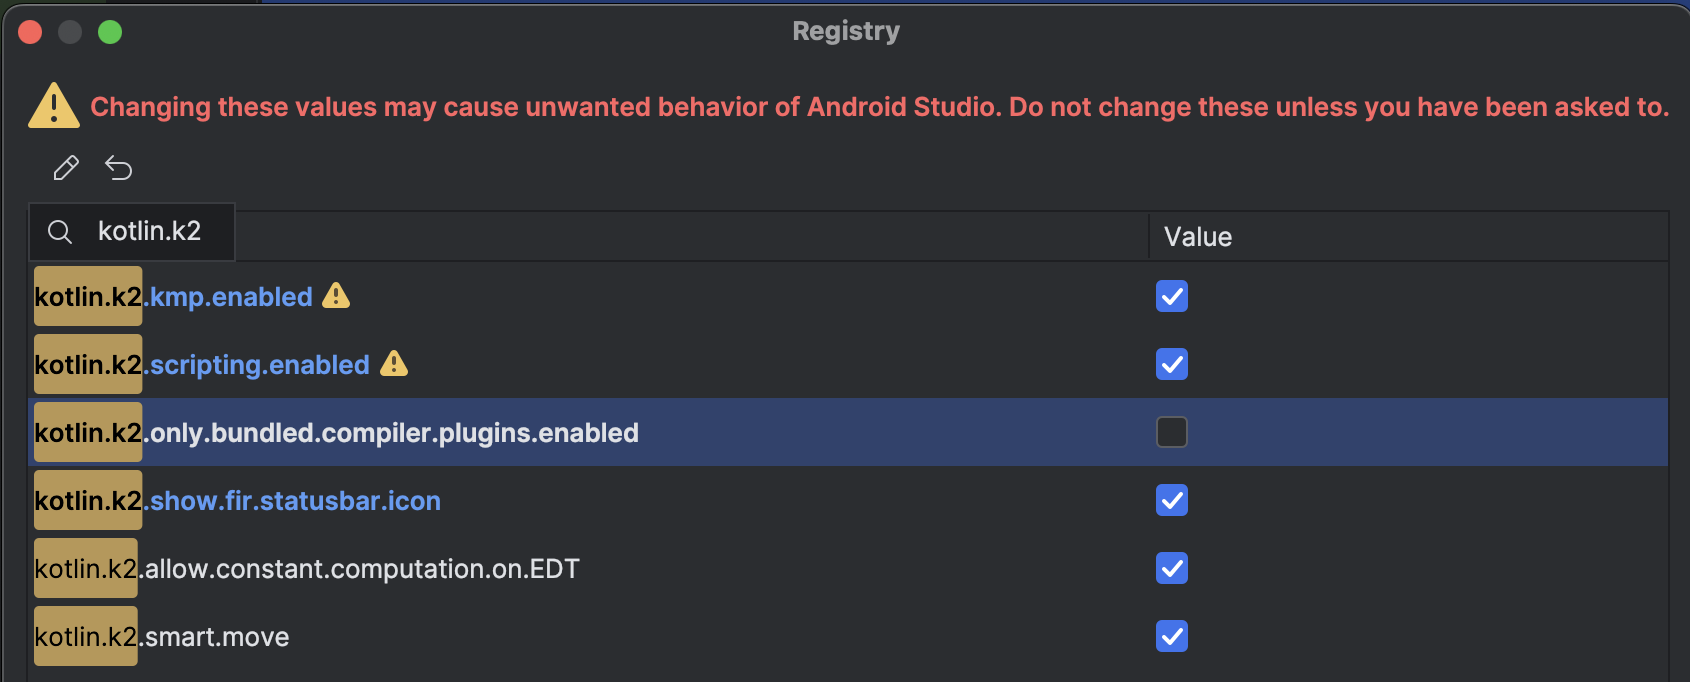
To allow our Compiler Plugin to be loaded by Android Studio, we need to open the Registry:
And set the kotlin.k2.only.bundled.compiler.plugins.enabled flag to false:
Configuration
If some naming conventions doesn’t fit your project, you can configure the plugin in your build.gradle.kts:
1
2
3
4
5
6
7
8
yamvil {
    level = YamvilLevel.Error // or Warning
    compose {
        screenSuffix = "MVIScreen" // Default value is "Screen"
        uiStateParameterName = "state" // Default value is "uiState"
        handleEventParameterMame = "onEvent" // Default value is "handleEvent"
    }
}
Conclusion
Yamvil is very young (0.0.2), and there’s still a lot of work to do, but I’m very excited about the possibilities it brings to the table! If you have any improvements ideas for Yamvil, you are more than welcome to open an issue or a PR on the GitHub repository!
Feel free to comment below if you have any comments or questions! :)
By the way, I’m also on Twitter and LinkedIn, so feel free to connect there too!
Happy coding! 📖